How to Build a Gaming PC: Complete Beginner-to-Pro Step-by-Step Guide (2026 Edition)
Building your own gaming PC gives you three major advantages:
- better performance per dollar
- full upgrade flexibility
- deeper hardware control
In 2026, building a gaming PC is easier than ever because:
- components are modular
- compatibility tools exist
- installation steps are standardized
- SSD storage simplified setup workflows
This guide walks you through:
- choosing components
- understanding compatibility
- assembling your PC safely
- installing Windows and drivers
- optimizing performance after build
Whether this is your first PC or your fifth upgrade cycle, this guide covers everything.
Intel’s official gaming build documentation explains that CPUs, GPUs, motherboards, RAM, storage, cooling, and PSUs form the essential hardware foundation of any gaming PC.
Table of Contents
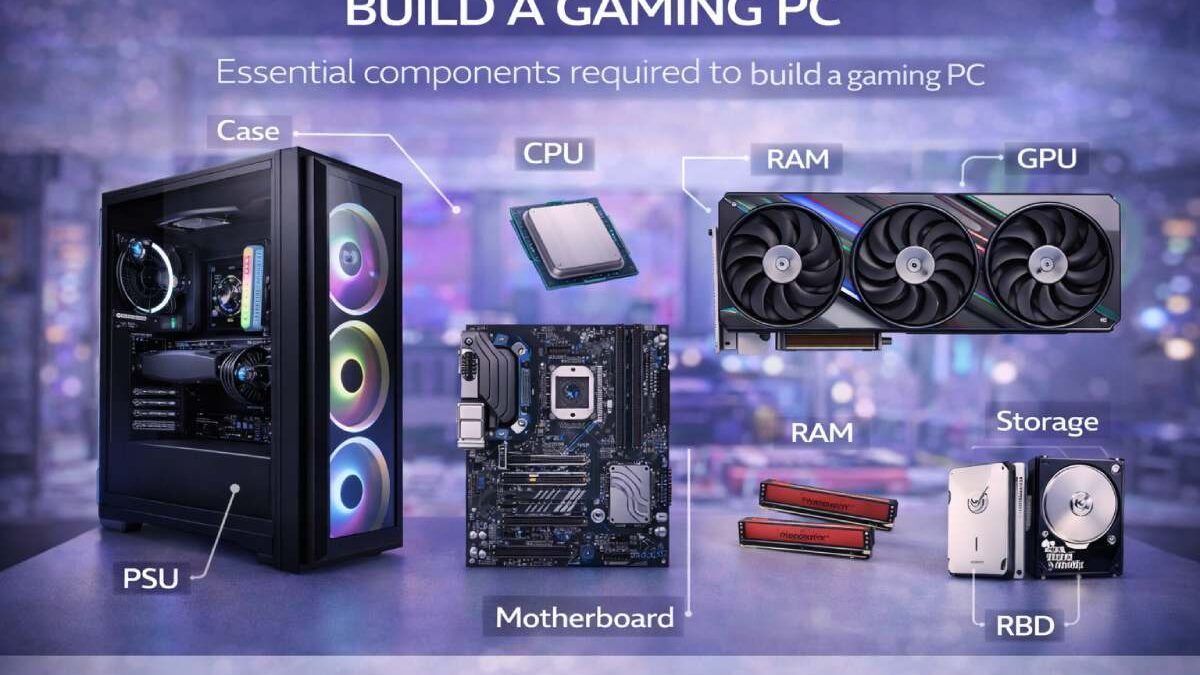
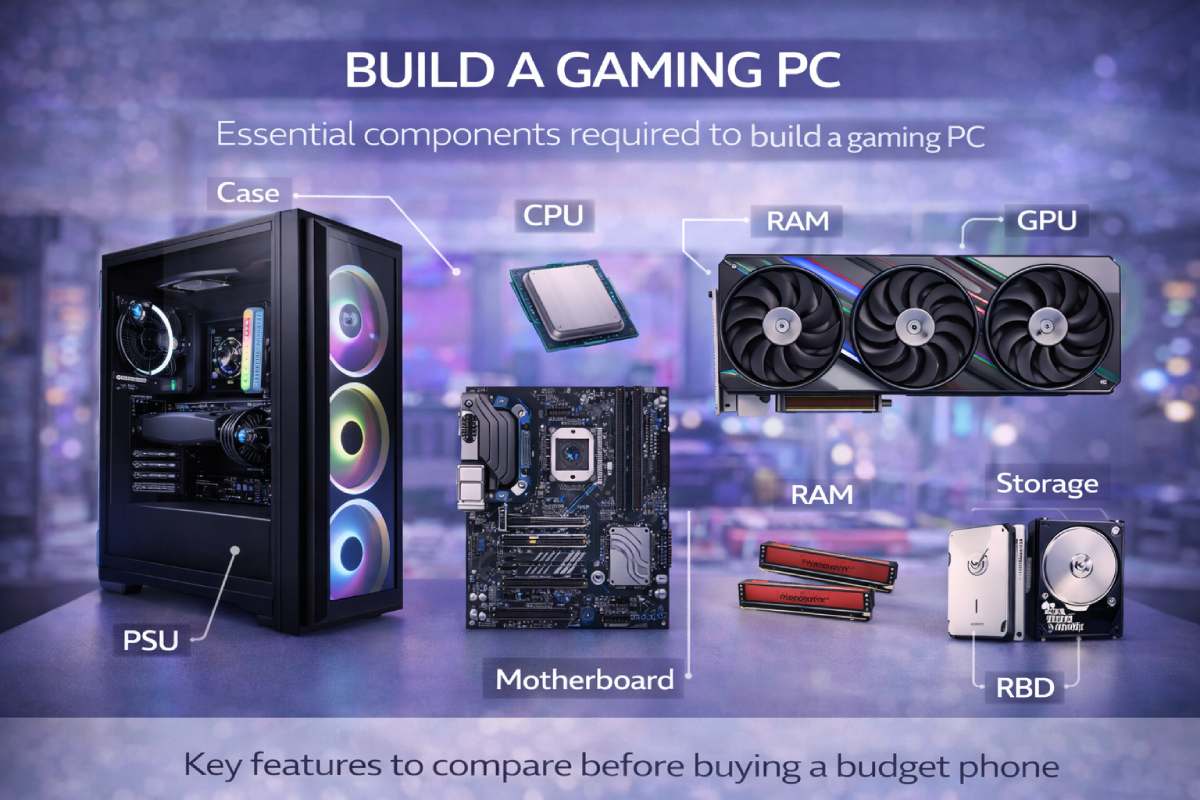
Quick Overview: Parts Required to Build a Gaming PC
Every gaming PC requires these core components:
| Component | Purpose |
| CPU | Executes instructions |
| GPU | Renders graphics |
| Motherboard | Connects components |
| RAM | Short-term memory |
| Storage | Game and OS data |
| PSU | Power delivery |
| Case | Physical housing |
| Cooling | Temperature control |
A dedicated GPU is essential for modern gaming performance.
Step 1: Decide Your Gaming PC Budget First
Before choosing hardware, define your target performance level.
Typical 2026 build tiers:
| Budget | Performance Target |
| $700–$900 | 1080p gaming |
| $1,000–$1,500 | High 1080p / entry 1440p |
| $1,600–$2,200 | 1440p high settings |
| $2,500+ | 4K gaming |
Your GPU determines most of your performance ceiling.
Step 2: Choose the Right CPU (Processor)
The CPU controls system responsiveness and game logic performance.
Modern games benefit from:
- strong single-core performance
- 6–8 cores minimum
- high boost clock speeds
The CPU coordinates all system instructions and affects multitasking, streaming, and background processes.
Recommended beginner CPU categories:
| Tier | Example Class |
| Entry | Ryzen 5 / Core i5 |
| Mid | Ryzen 7 / Core i7 |
| High | Ryzen X3D chips |
Avoid overspending here compared to GPU budget.
Step 3: Select the Graphics Card (GPU)
Your GPU determines:
- frame rate
- resolution
- ray tracing capability
- future game compatibility
The GPU is the most important component in a gaming PC build.
Budget allocation rule:
Spend 35%–45% of total build cost on GPU
Step 4: Choose a Compatible Motherboard
The motherboard connects all components together.
Key compatibility checks:
| Feature | Why It Matters |
| CPU socket | Must match processor |
| RAM type | DDR4 vs DDR5 |
| PCIe version | GPU bandwidth |
| Storage slots | NVMe support |
| Wi-Fi support | Optional convenience |
Motherboard form factors include:
- ATX
- Micro-ATX
- Mini-ITX
ATX builds are easiest for beginners.
Step 5: Install the Right Amount of RAM
Minimum recommendation (2026):
16 GB
Ideal recommendation:
32 GB
RAM stores temporary instructions needed by the CPU for fast access.
Streaming and multitasking benefit significantly from higher RAM.
Step 6: Choose Fast Storage (SSD Required)
Storage affects:
- boot speed
- game loading time
- system responsiveness
Recommended setup:
| Drive Type | Purpose |
| NVMe SSD | Primary OS |
| Secondary SSD | Games library |
Avoid HDD-only builds in 2026.
Step 7: Select the Right Power Supply (PSU)
Your PSU powers the entire system.
Choose:
- 80+ Bronze minimum
- correct wattage headroom
- trusted brand reliability
Semi-modular PSUs improve cable management and airflow.
Typical wattage needs:
| GPU Tier | PSU Range |
| Entry | 550 W |
| Mid | 650 W |
| High | 750–850 W |
Step 8: Pick a PC Case That Fits Everything
Cases come in three primary sizes:
| Case Size | Build Type |
| Full tower | Enthusiast |
| Mid tower | Standard |
| Mini-tower | Compact |
Case size determines airflow and upgrade flexibility.
Mid-tower is best for beginners.
Step 9: Choose a Cooling System
Cooling prevents:
thermal throttling
hardware wear
performance drops
Cooling options:
| Type | Use Case |
| Stock cooler | Entry builds |
| Air cooler | Mid builds |
| Liquid cooling | High builds |
Most beginners should start with air cooling.
Step 10: Assemble the Gaming PC (Correct Order)
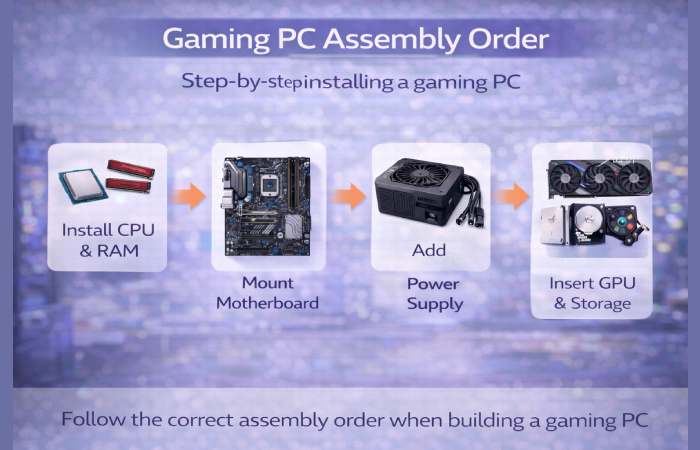
Follow this safe assembly workflow:
1 Install CPU
2 Install RAM
3 Install SSD
4 Mount motherboard
5 Install GPU
6 Connect PSU
7 Connect case cables
8 Install cooling
9 Cable management
Assembly order reduces risk.
Tom’s Hardware’s assembly walkthrough recommends installing CPU, RAM, SSD, motherboard, GPU, and PSU in a structured sequence to reduce installation errors.
Step 11: Install the Operating System
Most gaming PCs use:
Windows 11
Installation steps:
1 Create boot USB
2 Enter BIOS
3 Select boot drive
4 Install OS
After installation:
install chipset drivers
install GPU drivers
update Windows
Step 12: Install Essential Gaming Software
Recommended installs:
GPU control panel
Steam
Epic Games Launcher
Discord
Hardware monitoring tools
Software completes setup.
Beginner Build Example (Balanced Budget Setup)
Example configuration:
| Component | Target Tier |
| CPU | Ryzen 5 |
| GPU | RTX 4060 class |
| RAM | 16 GB DDR5 |
| Storage | 1 TB NVMe |
| PSU | 650 W |
| Case | Mid-tower |
Perfect for 1080p ultra gaming.
Common Compatibility Mistakes to Avoid
Never ignore:
CPU socket mismatch
RAM generation mismatch
PSU wattage limits
case clearance issues
Compatibility errors cause build failures.
Tools Needed to Build a Gaming PC
Simple toolkit:
Phillips screwdriver
thermal paste (optional)
anti-static surface
Modern builds require minimal tools.
BIOS Setup After First Boot
Check:
RAM speed profile
boot order
fan curves
CPU temperatures
Enable XMP or EXPO for RAM performance.
Cable Management Tips
Good cable routing improves:
airflow
cooling
aesthetics
Use:
rear routing channels
Velcro straps
modular PSU cables
Clean builds last longer.
Gaming PC Build Time Estimate
Typical first-time builder:
2–4 hours
Experienced builder:
60–90 minutes
Take your time.
How to Test Your Gaming PC After Building
Run:
temperature monitor
benchmark test
game stress test
Confirm stability before daily use.
Best Budget Gaming PC Build Strategy
Spend budget priority order:
GPU
CPU
RAM
SSD
Motherboard
Never reverse this order.
Airflow Setup Guide for Beginners
Install fans:
front intake
rear exhaust
Optional:
top exhaust
Balanced airflow prevents overheating.
Prebuilt vs Custom Gaming PC
| Feature | Custom Build | Prebuilt |
| Price efficiency | Better | |
| Upgrade flexibility | Better | |
| Setup difficulty | Higher | |
| Warranty simplicity | Lower |
Custom builds deliver best long-term value.
How to Upgrade Your Gaming PC Later
Easy upgrades:
GPU
RAM
SSD
Hard upgrades:
CPU
motherboard
Plan upgrades early.
Mistakes First-Time Builders Should Avoid
Avoid:
cheap PSU choices
tiny cases
incompatible RAM
ignoring airflow
These cause most failures.
Who This Guide Is For
Ideal readers:
first-time builders
console switchers
students
budget gamers
upgrade planners
Who Should Consider Prebuilt Instead
Choose prebuilt if:
no assembly confidence
limited time
no troubleshooting interest
FAQs
How much does it cost to build a gaming PC?
Typical builds range from $800 to $2,000 depending on performance targets.
Is building a gaming PC difficult?
No. Most components install without tools beyond a screwdriver.
What part matters most for gaming performance?
The GPU has the biggest impact on FPS.
Is 16 GB RAM enough for gaming?
Yes, but 32 GB improves multitasking.
How long does a gaming PC last?
Most builds remain relevant for 4–6 years.
Conclusion
Learning how to build a gaming PC gives you complete control over performance, upgrades, cooling, and long-term value. By selecting compatible components, assembling hardware in the correct order, installing the operating system properly, and optimizing airflow and drivers, you can create a powerful system tailored to your gaming needs. Once you understand the process, building a gaming PC becomes one of the most rewarding upgrades any gamer can make.